How To Plan Delivery Routes With Excel (With FREE Template)

Excel is great for organizing delivery data, but it can't plan routes on its own. Learn how to combine your spreadsheet with Google Maps or route planning software — and know when free tools stop being enough.
- Excel spreadsheets work well for organizing delivery data, but you'll need a mapping or route planning tool to create actual routes.
- Manual route planning (copying addresses to Google Maps) is free but only practical for routes under 25 stops.
- Google My Maps extends your range to 100 stops, but you still need to sequence stops manually in batches of 10.
- Automated route planning tools like Routific, RouteXL, or SoloRoute can sequence stops in seconds — saving significant time on routes over 15 stops.
- Free tools work for occasional planning or short routes. Regular routes over 25 stops typically justify paid software.
- All methods in this guide start with the same Excel setup — so you can try multiple approaches with the same spreadsheet.
- Route optimization software can reduce planning time from hours to minutes while producing shorter, more fuel-efficient routes.
A lot of small businesses run on Excel spreadsheets (or Google Sheets, if that’s your thing). And although I’m sure the original developers of Excel never imagined it could be used for route planning, the glory of Excel is its incredible flexibility — so yes, you can use it as a route planner!
There are two ways to approach route planning with Microsoft Excel or other spreadsheets:
- Manual stop sequencing: Use Excel to collect all your data, and possibly sort it by area code. Then copy addresses to a mapping tool like Google Maps and sort your stops manually. This is the most basic approach, and it’s free! But it’s only suitable for routes of up to about 15 stops. With more stops, it becomes extremely difficult to create an efficient stop sequence.
- Automated stop sequencing: Collect all the data about your stops in Excel, then upload it to a route planning tool and let an algorithm choose the most efficient route for you. This will take a lot less time compared to manual route planning, and give better results including shorter routes and lower fuel costs. There are free tools if your routes are short, or if you don’t need to plan routes often — but if you’re regularly planning routes of more than 25 stops, you will be better off with a paid tool like Routific.
In this article we’ll first show you how to set up your spreadsheet for the easiest route planning, then share step by step tutorials for five different ways to plan routes with Excel. Two of them are manual and three are automated. We’ll also share a mix of free and paid route planning tools.
These are the methods we’ll share:
- Copy your addresses to Google Maps (up to 25 stops, free)
- Upload addresses to Google’s My Maps (up to 100 stops, free)
- Use Routific’s Chrome extension in Google Maps (up to 25 stops, free)
- Upload your addresses to a route optimization app like Routific (up to thousands of stops, mix of free and paid)
- Use a Google Maps API function inside Excel (up to 25 stops, paid
If you’re not sure which method to use, check out the summary table at the end of the article.
💡Want to skip the hard work and just plan the most efficient routes? Routific can save you hours every week. Try it free!
Let’s start with how to set up your spreadsheet for route planning success.
How to format your Excel file for delivery route planning
Setting up your spreadsheet with the right headers and data from the start will streamline the whole process and make things easier.
The bare minimum is to start with two columns:
- Customer or stop name
- Address: This should contain the full address including street number, street name, city, state or province, and zip or postal code.
Optional additional columns, depending on your use cases, include:
- Zip code/postal code/area, repeated in a separate column. This enables you to sort by area. AI tools like CoPilot or Gemini can easily copy this information from your address column.
- Time window start and time window end. The earliest and latest times you can visit the stop. This is especially useful for field sales and other use cases where you need to visit during office hours, for example.
- Stop duration or service time. How long you expect to be at the location. This could be as little at 5 minutes for a simple delivery drop-off, or a couple of hours for a field service call.
- Load: This is useful in delivery use cases, if you know how many packages or items need to be dropped off.
- Email and phone number: It’s always helpful to be able to contact your customer!
- Driver: If you have more than one driver you might to pre-assign them to particular stops. Or you might want to assign a technician to a particular job.
- Notes: Here’s where you put important information like buzzer codes, special delivery instructions, parking locations, etc.
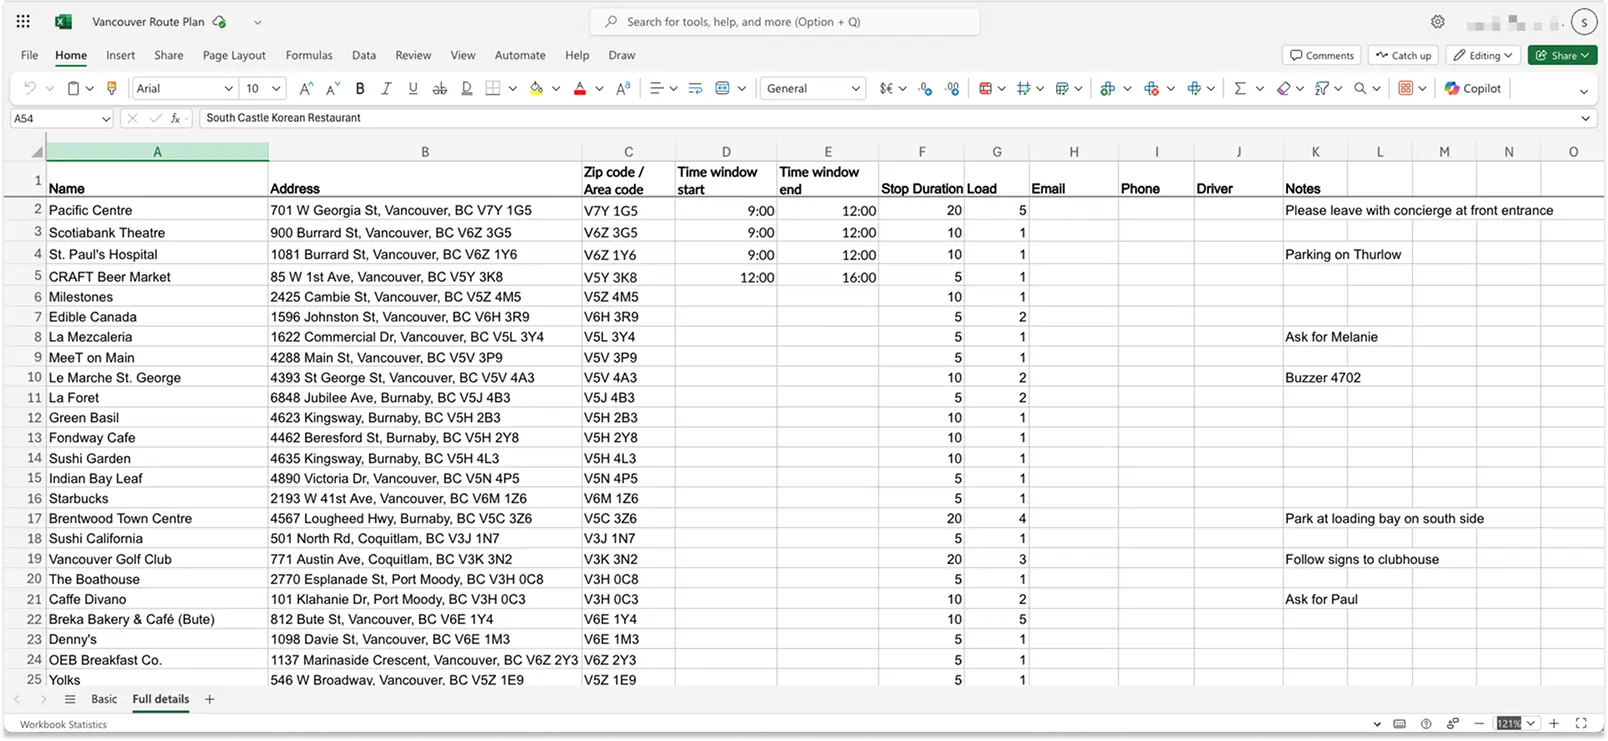
Here's a free Excel template to help you get started. It has two tabs, Basic and Detailed. Here’s a sample of how the Detailed sheet might look with many addresses filled in:
If you live somewhere where Google Maps address data is not reliable, you might want to include latitude and longitude coordinates. To do this, simply create two columns titled Latitude and Longitude as well, or instead of, the Address column.
How to group your delivery addresses by area
Google Maps can plan multi-stop routes up to a limit of 10 stops (or 25, if you use one of the tips in this article). So if you have more than 25 stops, you’ll need to work in batches. This is where your separate column for zip code/area comes in handy:
- Check that you have a column for zip code/postal code or area.
- Sort the sheet by that column.
- Add a new column called Delivery Zone.
- Allocate nearby zip codes to delivery zones in batches of 10-25.
- If you plan to use Google My Maps, copy all the stops for each delivery zone to a separate sheet. This will enable you to colour-code your stops in different zones.
This video walks through sorting your spreadsheet by zip code, creating delivery zones, and splitting stops into batches for Google Maps:
Now that your spreadsheet is set up, we can get on with the route planning. Let’s start with the first manual method:
1. Copy your addresses from a spreadsheet to Google Maps
Best for: Occasional use, 25 stops or less.
This is easy, if time consuming:
- Once you have all your information ready in Excel, open up Google Maps in a new browser tab.
- Copy the first address on your list into Google Maps.
- Click Directions to start adding more stops.
- Once you’ve hit the 10-stop limit, open up a new Google Maps tab and continue adding stops.
- When you get to 20 or 25 stops, use the More Than 10 tool to combine your separate Google Maps lists into one big map with 25 stops.
- Drag and drop the stops around in the list until you’re happy with the resulting route.
- Save or share your route to the Google Maps mobile app on Android or iPhone to get real-time driving directions.
💡 Get detailed step by step instructions, with pictures, in our article on how to plan a route with multiple stops in Google Maps.
This is a good-enough route planning method if you only need to do it a couple of times a year. But it has some limitations, apart from the 25-stop limit:
- You can’t optimize routes using constraints like delivery time windows, vehicle load capacities, driver breaks, etc.
- It can take a lot of time to choose the most efficient order and sort your stops manually.
- Google Maps routes show the total drive time, but not stop duration (the time at each stop complete the delivery or job). This can make it hard to know how long routes will really take.
If you need more than 25 stops, the second manual route planning method is to use Google My Maps. We’ll cover this lesser-known but powerful tool in the next section.
2. Upload your spreadsheet to Google My Maps
Best for: Occasional use, 100 stops or less.
Google My Maps is a bit more complex to use, but it does extend your range to 100 stops. So if you need to plan a lot more than 10 stops, this is worth trying. You still need to plan in batches of 10, since Google My Maps has a limit of 10 stops per layer for driving directions. Here’s how to do it:
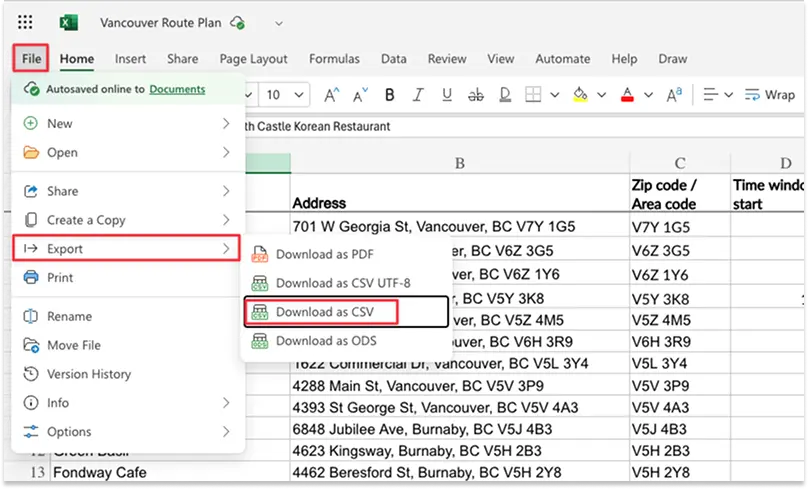
1. Export your spreadsheet: The first step is to save your export as a CSV. In Excel, select File > Export > Download as CSV; in Google Sheets, select File > Download > Comma-separated values.
2. Upload your csv file: At http://mymaps.google.com/, click the red button that says ‘Create a New Map’. Now name your map, and in the top left-hand corner, click ‘Import’.
Drag and drop your CSV file into the box, or click the blue Browse button to select a file from your computer.

3. Tell Google which columns to use for your stop addresses. After you import your file, another box will appear asking you which columns in your spreadsheet Google Maps should choose to map each location. Select ‘Address’ — or, if you’ve split the addresses up into separate columns, select all that apply.

4. Tell Google which additional info to include stop details: Next, Google Maps asks you which column to use as a title for each stop. Choose the column you’ve titled “Name” or “Customer Name”.

5. Plot your stops onto the map: Click “Finish” and all the addresses in your spreadsheet will be plotted on the map.
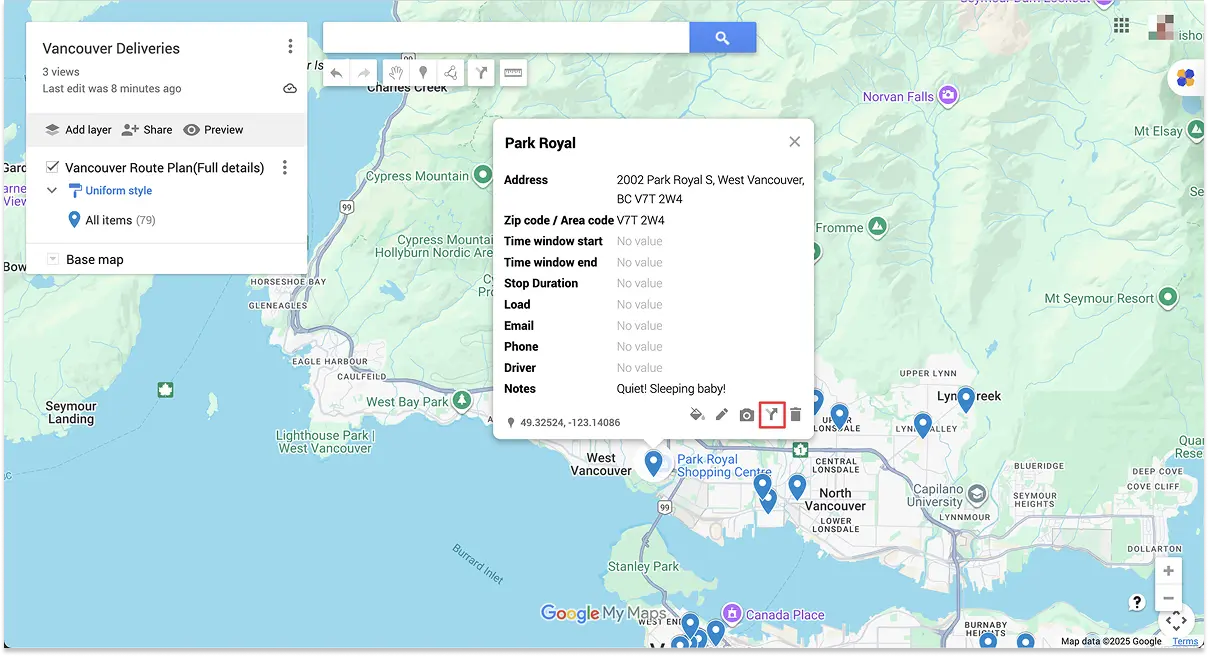
If you click on any of your stops, you will see that all the information from your spreadsheet has been included. This is a really neat feature of My Maps!

Notice that all 79 stops in this file have been imported as a single layer. If you want to use delivery zones, import the stops for each zone as a separate file. That will create different layers that you can color code.
6. Build your delivery routes: To get directions between the points on the map, click on a stop and then click on the arrow icon at the bottom right of the white window.
The stop you’ve selected will appear on the left panel as stop B. Put your starting location as stop A.
From there, continue to add more stops by clicking ‘Add Destination’ and then double-clicking stops on the map until you’ve plotted out a 10-stop route. You won’t be able to add more stops in this layer. Just choose a spot to start the next part of your route, and continue in the same way.
You’ll need to look carefully at the map to manually determine an efficient order for your stops. You can drag and stops within a layer to change the route.
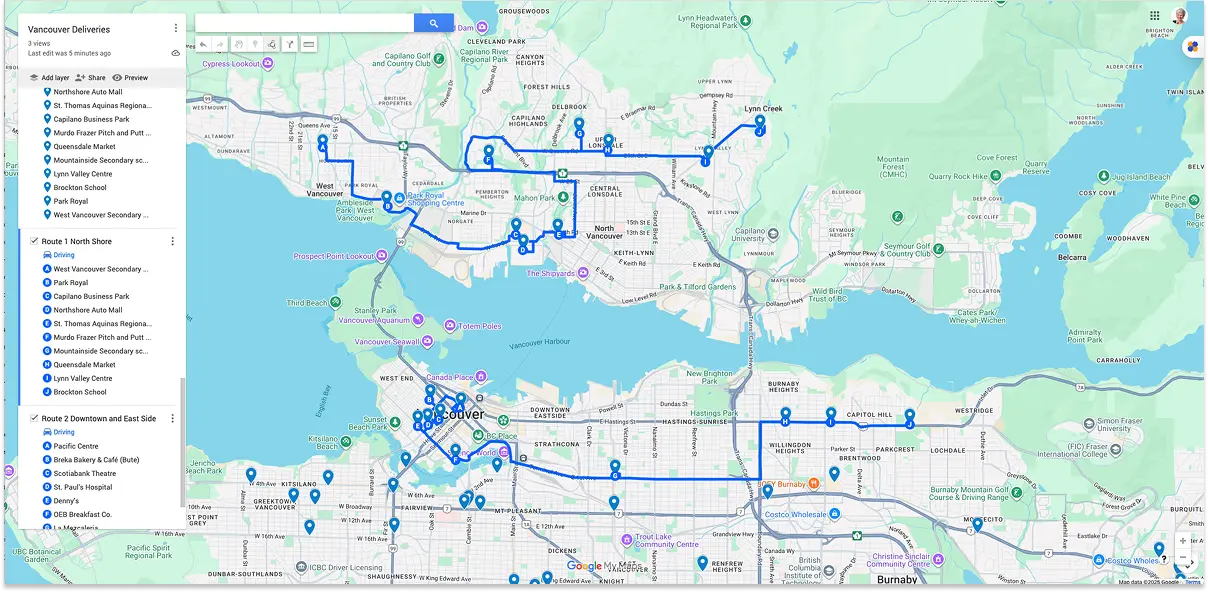
Here’s a map showing two routes already created:
Understanding route planning constraints in Google My Maps
As you can probably tell by now, Google My Maps is an incredibly powerful mapping tool that can display a lot of geographical information. BUT: It was never designed to find the shortest route between multiple stops. Manual sorting is ok when you only have a handful of stops, but it’s really cumbersome once you’re over 20-30 stops.
If you’re running a business you’ll also notice it’s also really hard to factor in constraints like delivery time windows and vehicle capacity, driver breaks, etc.
This is why automated route planning can save so much time and hassle. In the next three sections we’ll look at the Routific Chrome extension for Google Maps, specialist route optimization software like Routific, SoloRoute, or RouteXL, and a specialist Microsoft Excel plugin that will plan routes from right inside Excel.
3. Use the Routific Chrome extension
Best for: Occasional use, automated planning of up to 25 stops.
If you use Google’s Chrome browser, Routific’s free extension can help you combine the power of Excel and Google Maps. It automatically reorders your Google Maps stops into an optimized sequence. Here’s how to use it:
- Go to the Chrome web store and add the extension.
- Open Google Maps and click “Continue with Google’ to connect your account so that Routific’s routing algorithm can read your map info and suggest a new route.
- Click “Take me there” to open a new Google Maps tab and start adding stops. Keep clicking Add Destination and adding stops until you run out of space.
- Use the MoreThan10 tool to get up to 25 stops on your map.
- Once you’ve added stops, click to optimize and wait a few seconds while the algorithm does its job.
- That’s all! You can share your optimized route in the same way as any other route you’re created. To hide the Routific panel, just click →| to move it to the side.
So far, we’ve focussed on route planning using Google Maps – but as we’ve said, it’s great for mapping and getting driving directions, not so great at multi-stop route planning. In the next section, we’ll talk about how to upload your Excel spreadsheet to a proper route planning app for automatic route optimization.
4. Upload your spreadsheet to a route planning app
Best for: Free tools can plan up to 25 stops automatically. Consider a paid tool if you’re regularly planning dozens or hundreds of stops.
The more stops you have, and the more complex your needs are, the more you’ll need to look beyond Google Maps and use automated route planning.
Free route optimization apps like RouteXL and SoloRoute make it easy to copy or upload your spreadsheet data, then plan your route in one click:
- Soloroute: Route up to 25 stops free. There’s no paid tier.
- RouteXL: Plan up to 20 stops free. There are paid tiers available that will allow planning longer routes, and multiple routes per day.
These apps will give you a basic planned route that you share to Google Maps for driving.
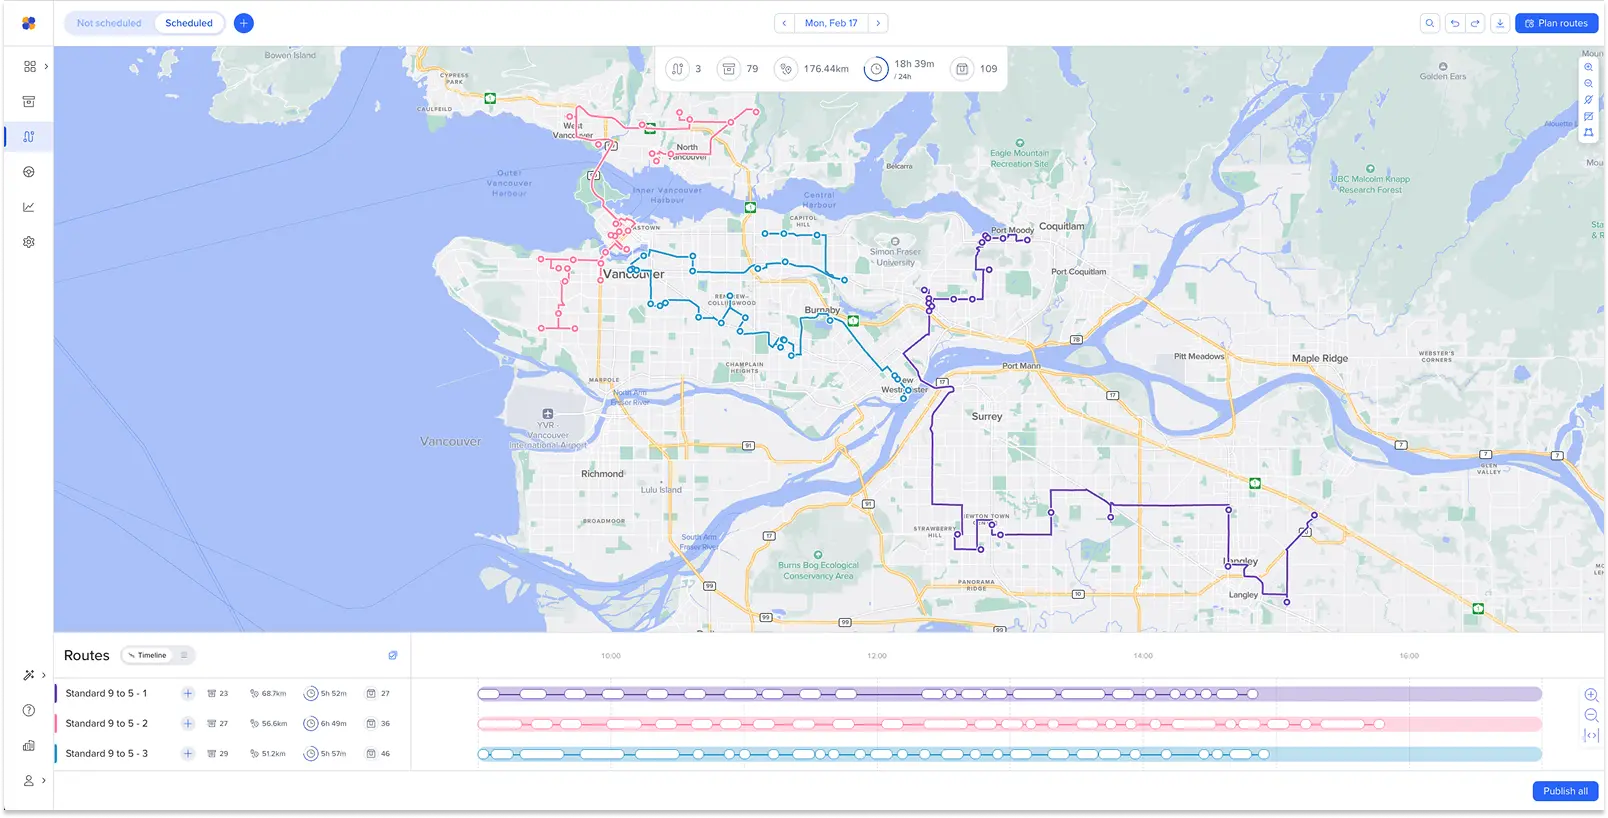
If you need more functions like time windows, a driver mobile app so you can send routes directly to drivers, real-time tracking, the ability to send notifications to your customers, or proof of delivery — you’ll need something like Routific. This automates the entire process of route planning: just upload your spreadsheet and driver information, and the algorithm calculates the shortest or the fastest route, depending on your preference. It takes delivery time windows and other constraints into account, and allows for multiple drivers.
With proper route optimization, you can cut planning time from hours to just minutes. No more sorting and batching by zip code! No more eyeballing the distances between stops and manually adding stops into your delivery route!
Routific is free up to 100 stops a month, and $150 a month up to 1,000 stops. After that per-stop pricing kicks in.
There are other route planning apps that may meet your needs. Check our reviews:
- If you're looking for free options to start, check out free multiple stop route planners.
- If you’re ready to invest in something more powerful, check out the best route optimization software.
Most of these route planning apps accept CSV file uploads, which means you’re already all set up to try them out.
5. Use a Google Maps API tool inside Excel
Best for: Excel superfans who want automated route planning right inside their spreadsheet.
If you’re a Microsoft Excel superfan and don’t want to use any other software at all, there is another option. The team at Excel Distance Calculators has created a great little Excel route planning calculator that lets you optimize up to 20 stops right inside the spreadsheet, with a link to Google Maps so you can see the route mapped out.
Here’s their video explaining how it works:
[EMBED YouTube video: https://youtu.be/-BtCFxsBl-g?si=ZDQ0EY8clQ3SGuXQ]
This is a nifty tool, but we’ll say it again: This is for Excel superfans only. Here’s why:
- You will need to get and install a Google Maps API key. This is not very difficult, but it is an extra step that many people might want to avoid. There’s also a usage limit of 40,000 calculations a month; after that you’ll have to pay Google. Most people will never reach the limit, but it’s something to be aware of.
- It’s not free. The cost is $97 for a one-user licence, or $187 for a multi-user licence. The advantage is that it’s a once-off fee so you won’t be locked into a recurring contract. But you can plan 20-stop routes for free using RouteXL, or 100 stops a month for free with Routific – and both of those allow you to upload a CSV file, or copy and paste a list of addresses.
- You’re limited to routes of no more than 20 stops.
- There are no delivery management features like tracking route progress, communicating ETAs to customers, or getting proof of delivery.
Our takeaway: If you’re a solo operator, doing routes with less than 20 stops, and you’re completely happy with keeping all your workflows in Excel — this might be the perfect tool for you. But if you already have a list of stops in an Excel spreadsheet, there are easier, more powerful ways to do route planning.
Summary table: Which Excel route planning method is best for you?
Quick rules
- Under 15 stops, occasional use → Method 1 or 3
- 15–100 stops, occasional use → Method 2 or 4 (free tier)
- Daily routing or 25+ stops → Method 4 (paid tier)
- Must stay in Excel → Method 5
Frequently Asked Questions

How To Use Google Maps As A Delivery Route Planner

The 10 Best Free Route Planners — That Aren’t Google Maps