Google Maps Route Planner: How To Plan Multi-Stop Routes

Google Maps caps routes at 10 stops and won't optimize stop order. Here are all the ways to push Google Maps to its route planning limits — and when to move on to a proper route planning app.
- Google Maps lets you plan a route with up to 10 stops per trip.
- Google Maps does not optimize stop order — you have to drag and drop stops manually to find the shortest route.
- You can extend your route to 25 stops by combining multiple Google Maps pages with the free MoreThan10 tool.
- For routes with more than 25 stops, multiple drivers, or delivery features like proof of delivery and customer notifications, you need dedicated route planning software.
- If you're comparing dedicated route planner apps, see our roundup of the 6 best multi-stop route planners. This article focuses on Google Maps itself.
Google Maps lets you plan a route with up to 10 stops. For more stops — or to automatically find the shortest order — you can combine Google Maps with the free MoreThan10 tool, or use dedicated route planning software.
This article walks through three methods, in order of how many stops they handle:
- Google Maps on its own — for routes up to 10 stops.
- Google Maps + MoreThan10 — a free workaround for routes up to 25 stops.
- Dedicated route planners — for anything larger, or for delivery work.
💡 Planning delivery routes? See our Google Maps route planner for deliveries guide for a delivery-specific walkthrough, or skip ahead to why Google Maps falls short for delivery work.
How to plan a multi-stop route in Google Maps (up to 10 stops)
Google Maps has a built-in route planner that handles up to 10 destinations (also called waypoints). Here's how to use it.
1: Add your first stop
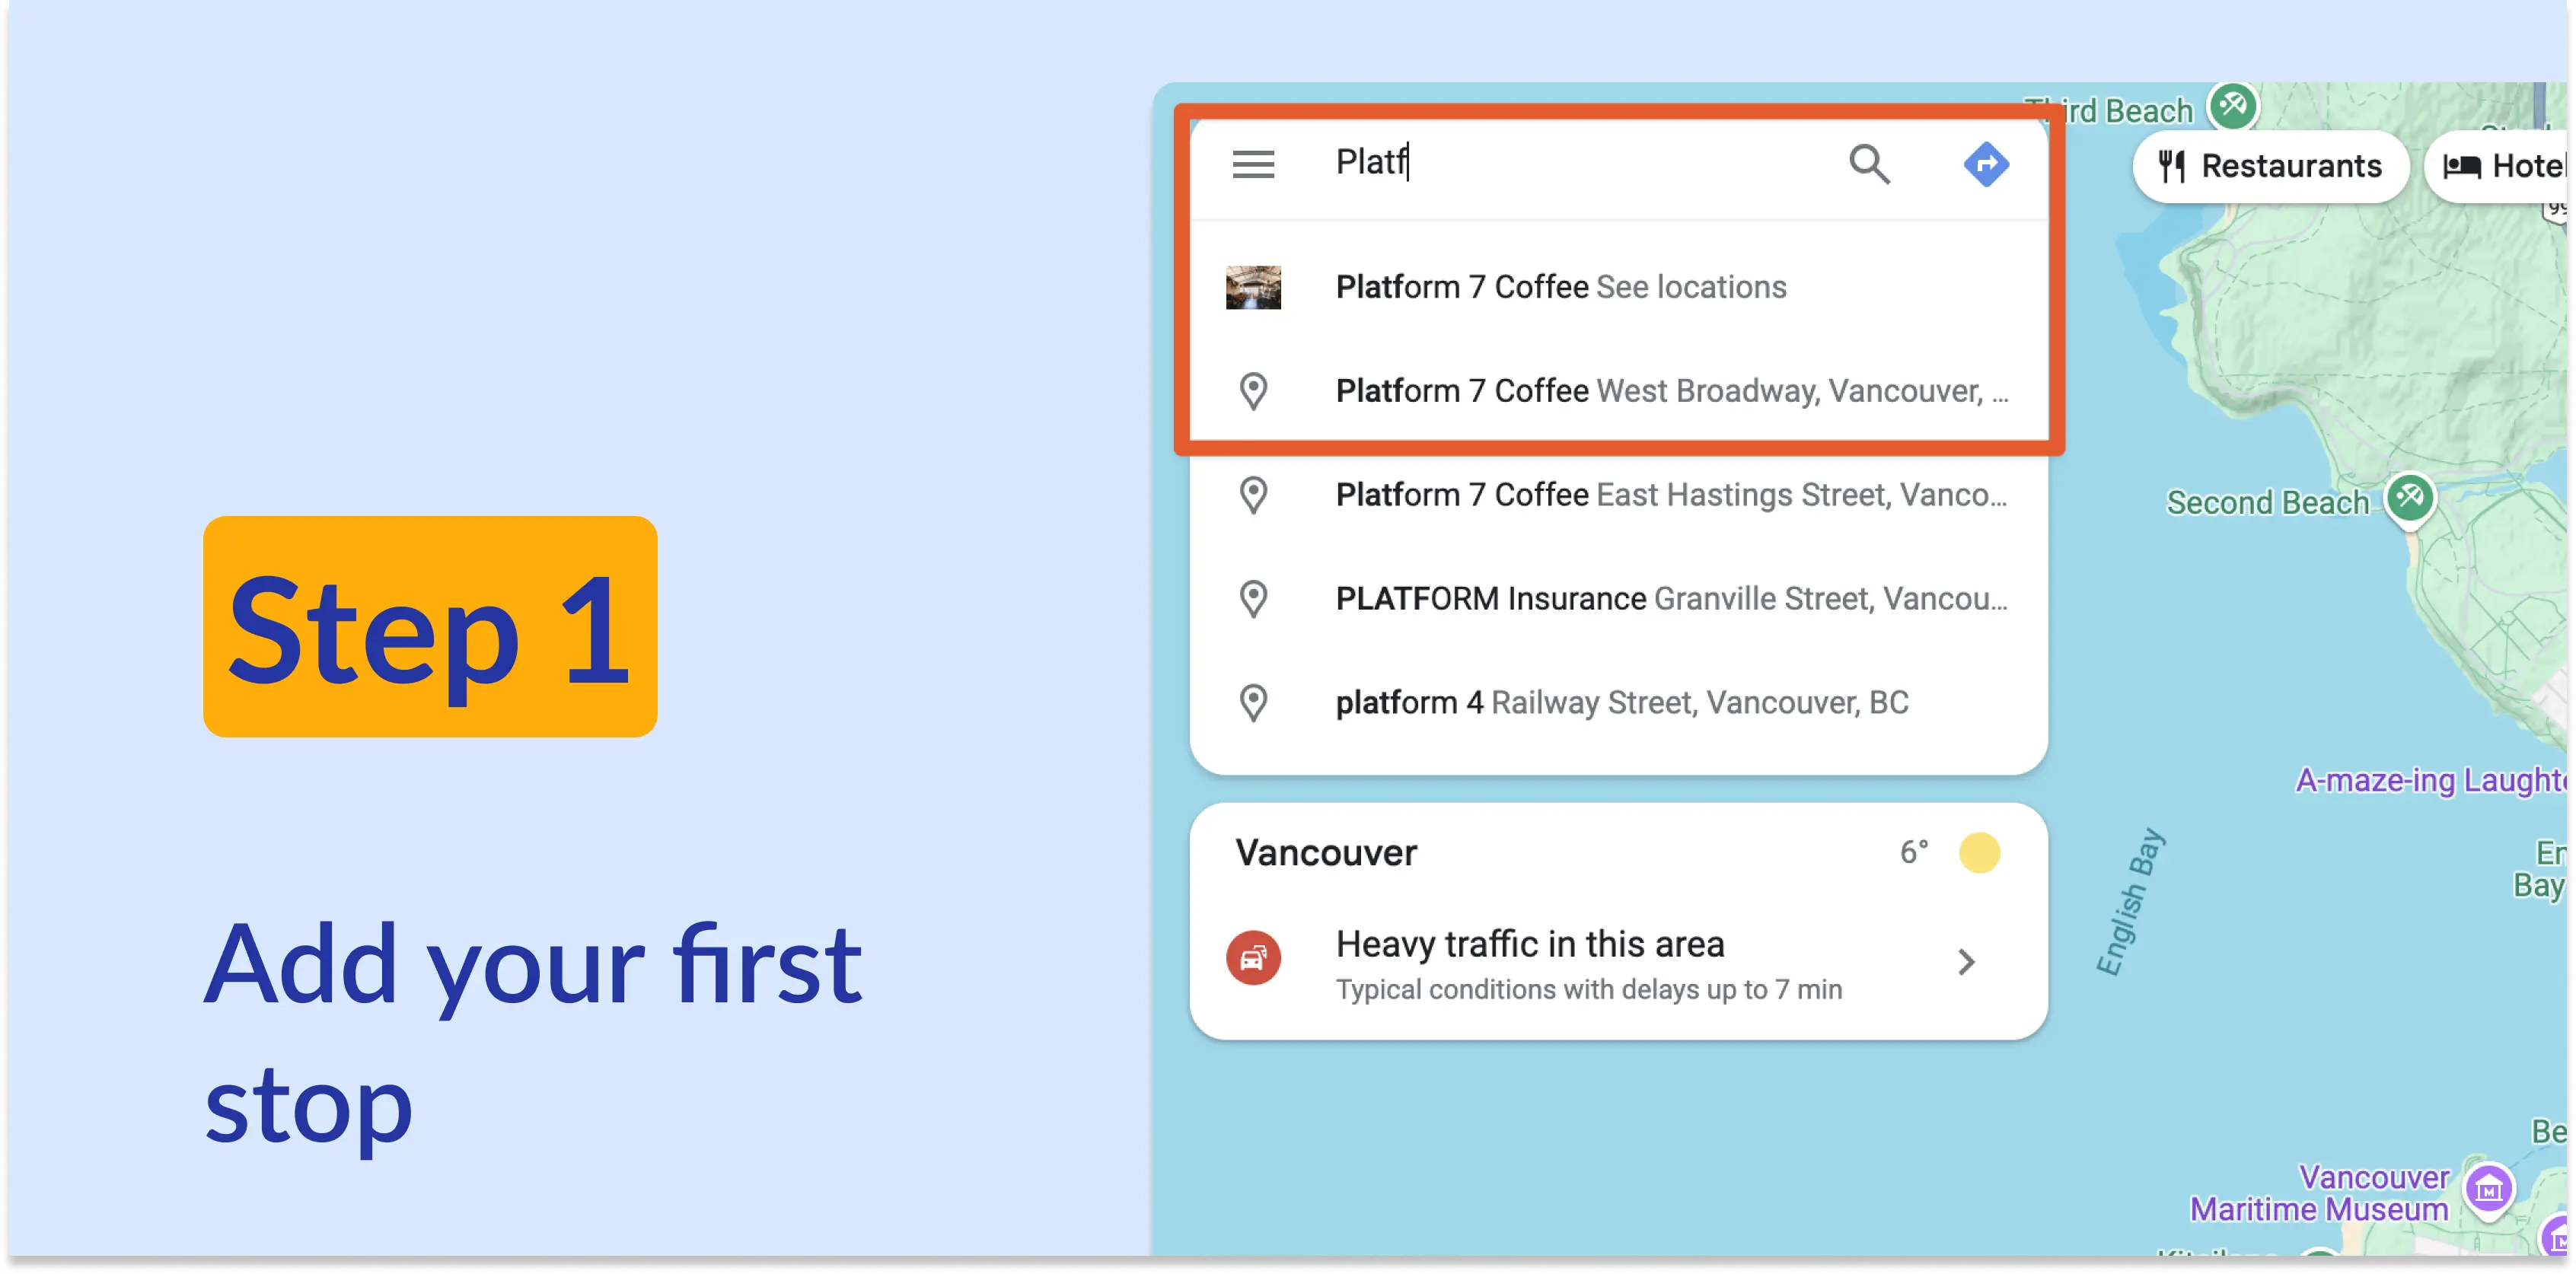
Go to Google Maps and add your first stop. You can use a street address, or just start typing the name of a business or place and Google will find it. (Sometimes more than one place has the same name, so double-check that Google has picked the right one.)
If you're planning ahead, have your full list of stops ready in a spreadsheet. That way you won't miss anything, and you can keep track of exact addresses, place names, and any notes you need.
In our example, we'll start at Platform 7 Coffee, one of our local favorites in Vancouver.
2: Click Directions to open the route panel
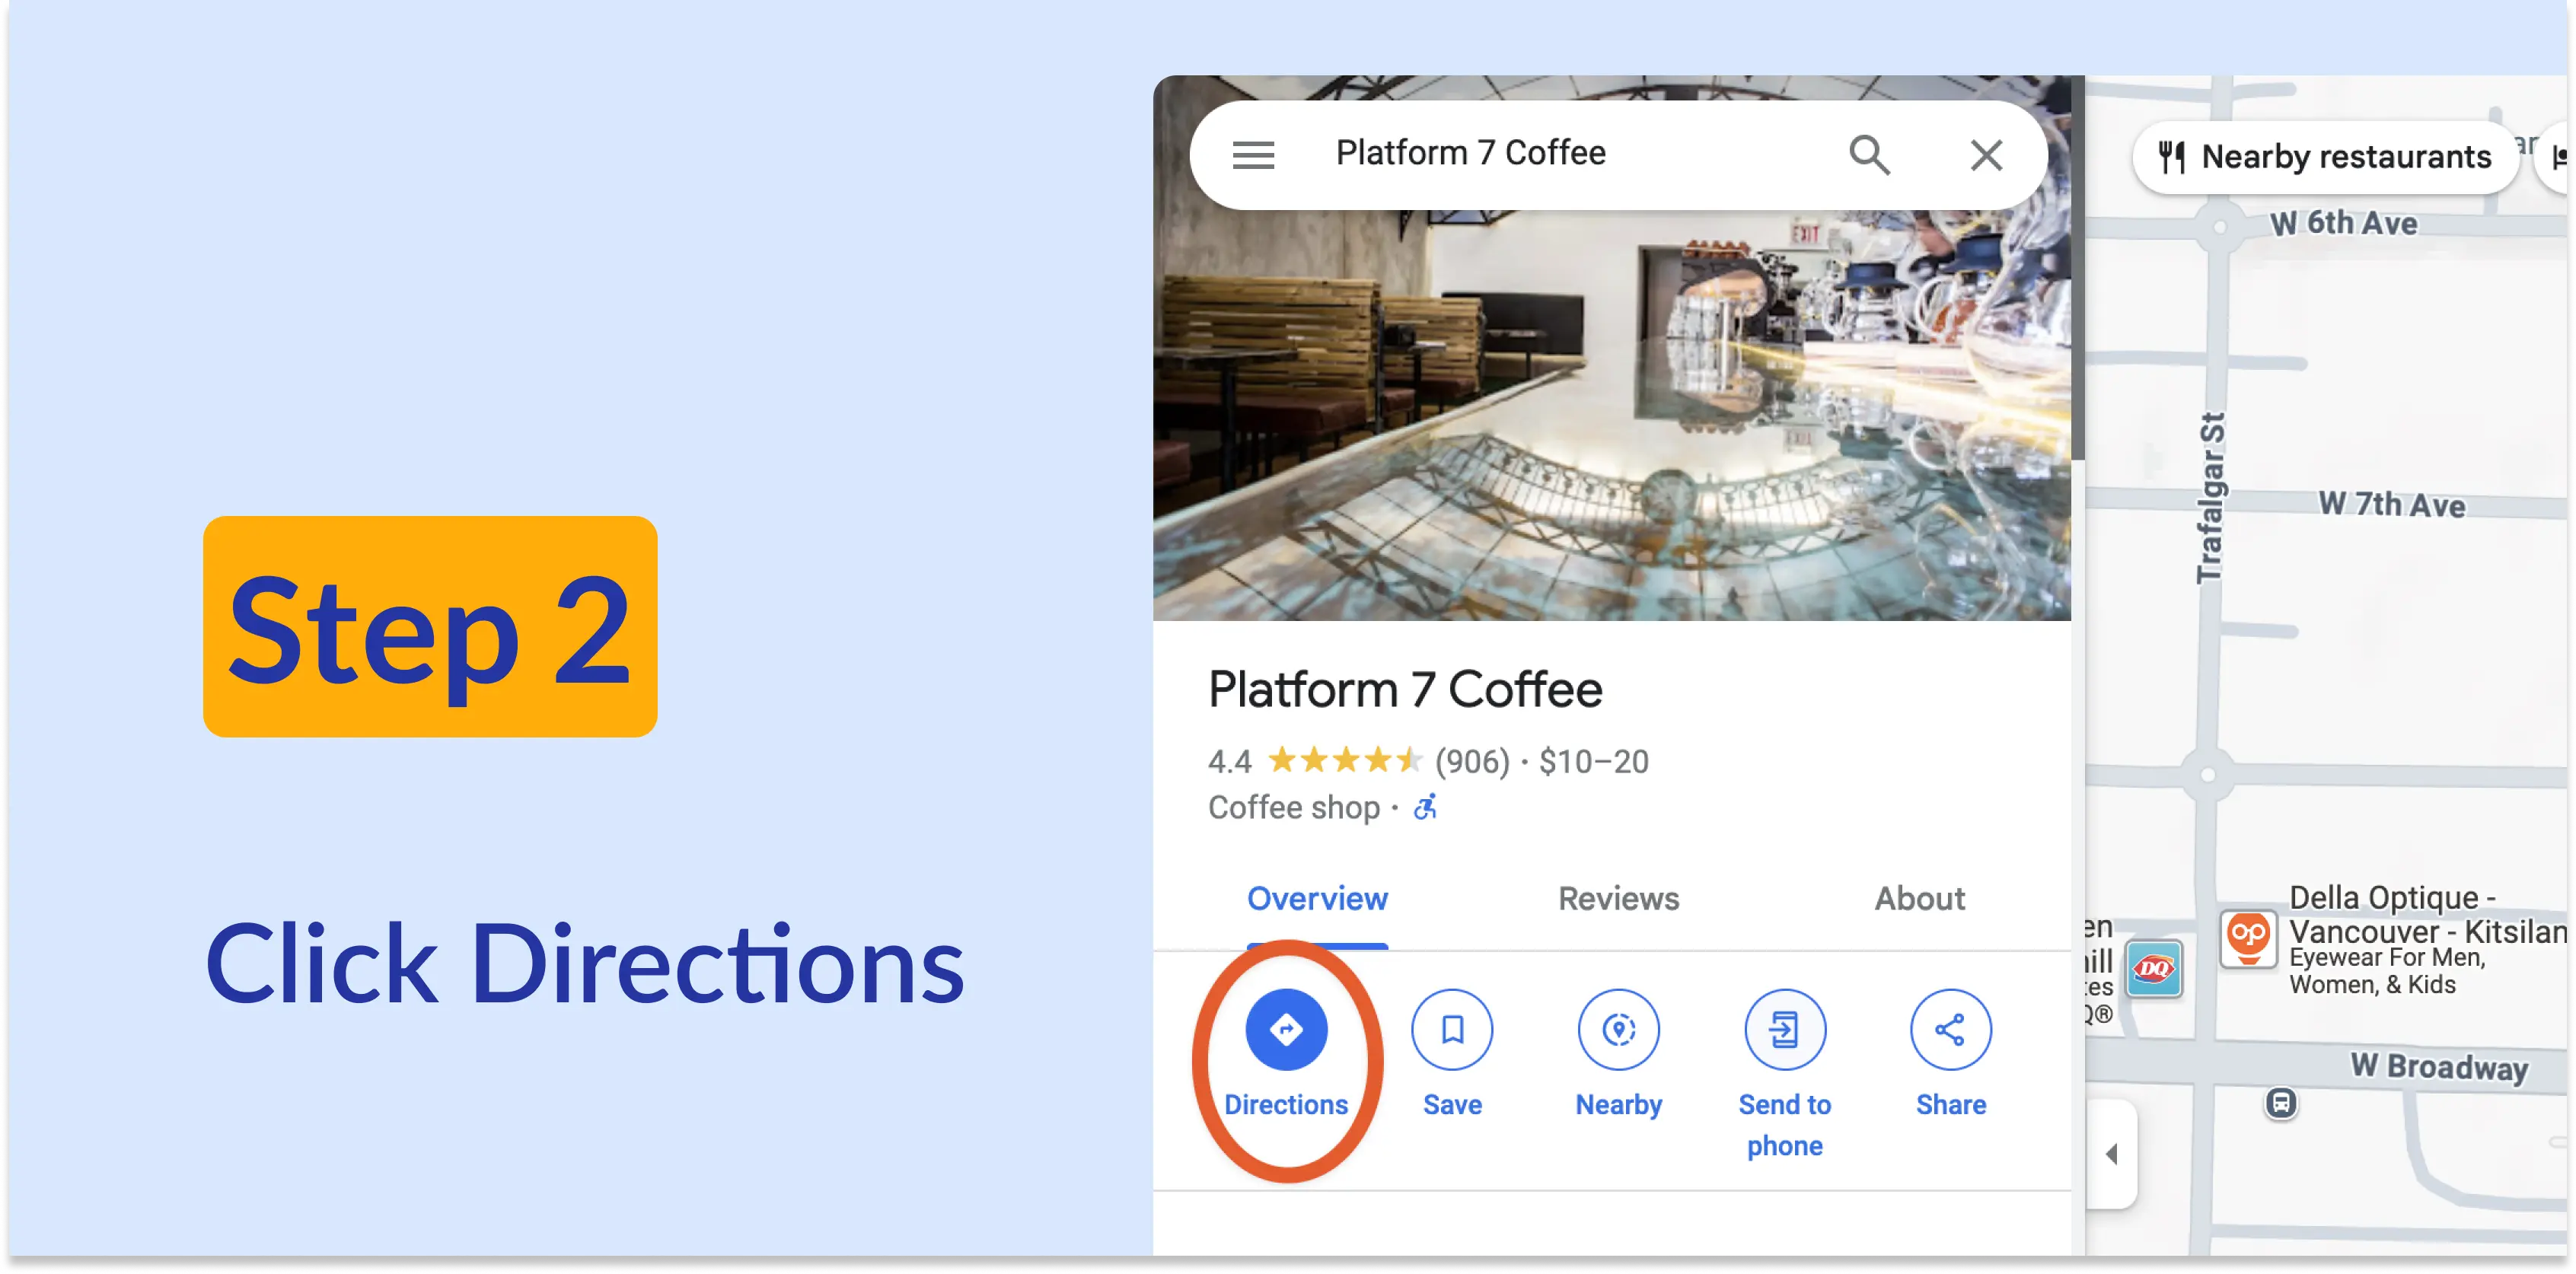
With your first destination set, Google will open a preview panel on the right-hand side. Click the “Directions” button to open the route panel and start adding more addresses.
3: Add a starting address

Google uses this step to set your starting point. If you're starting from your current location, click to confirm “Your location”. If you're starting somewhere else, add that address.
4: Add more destinations
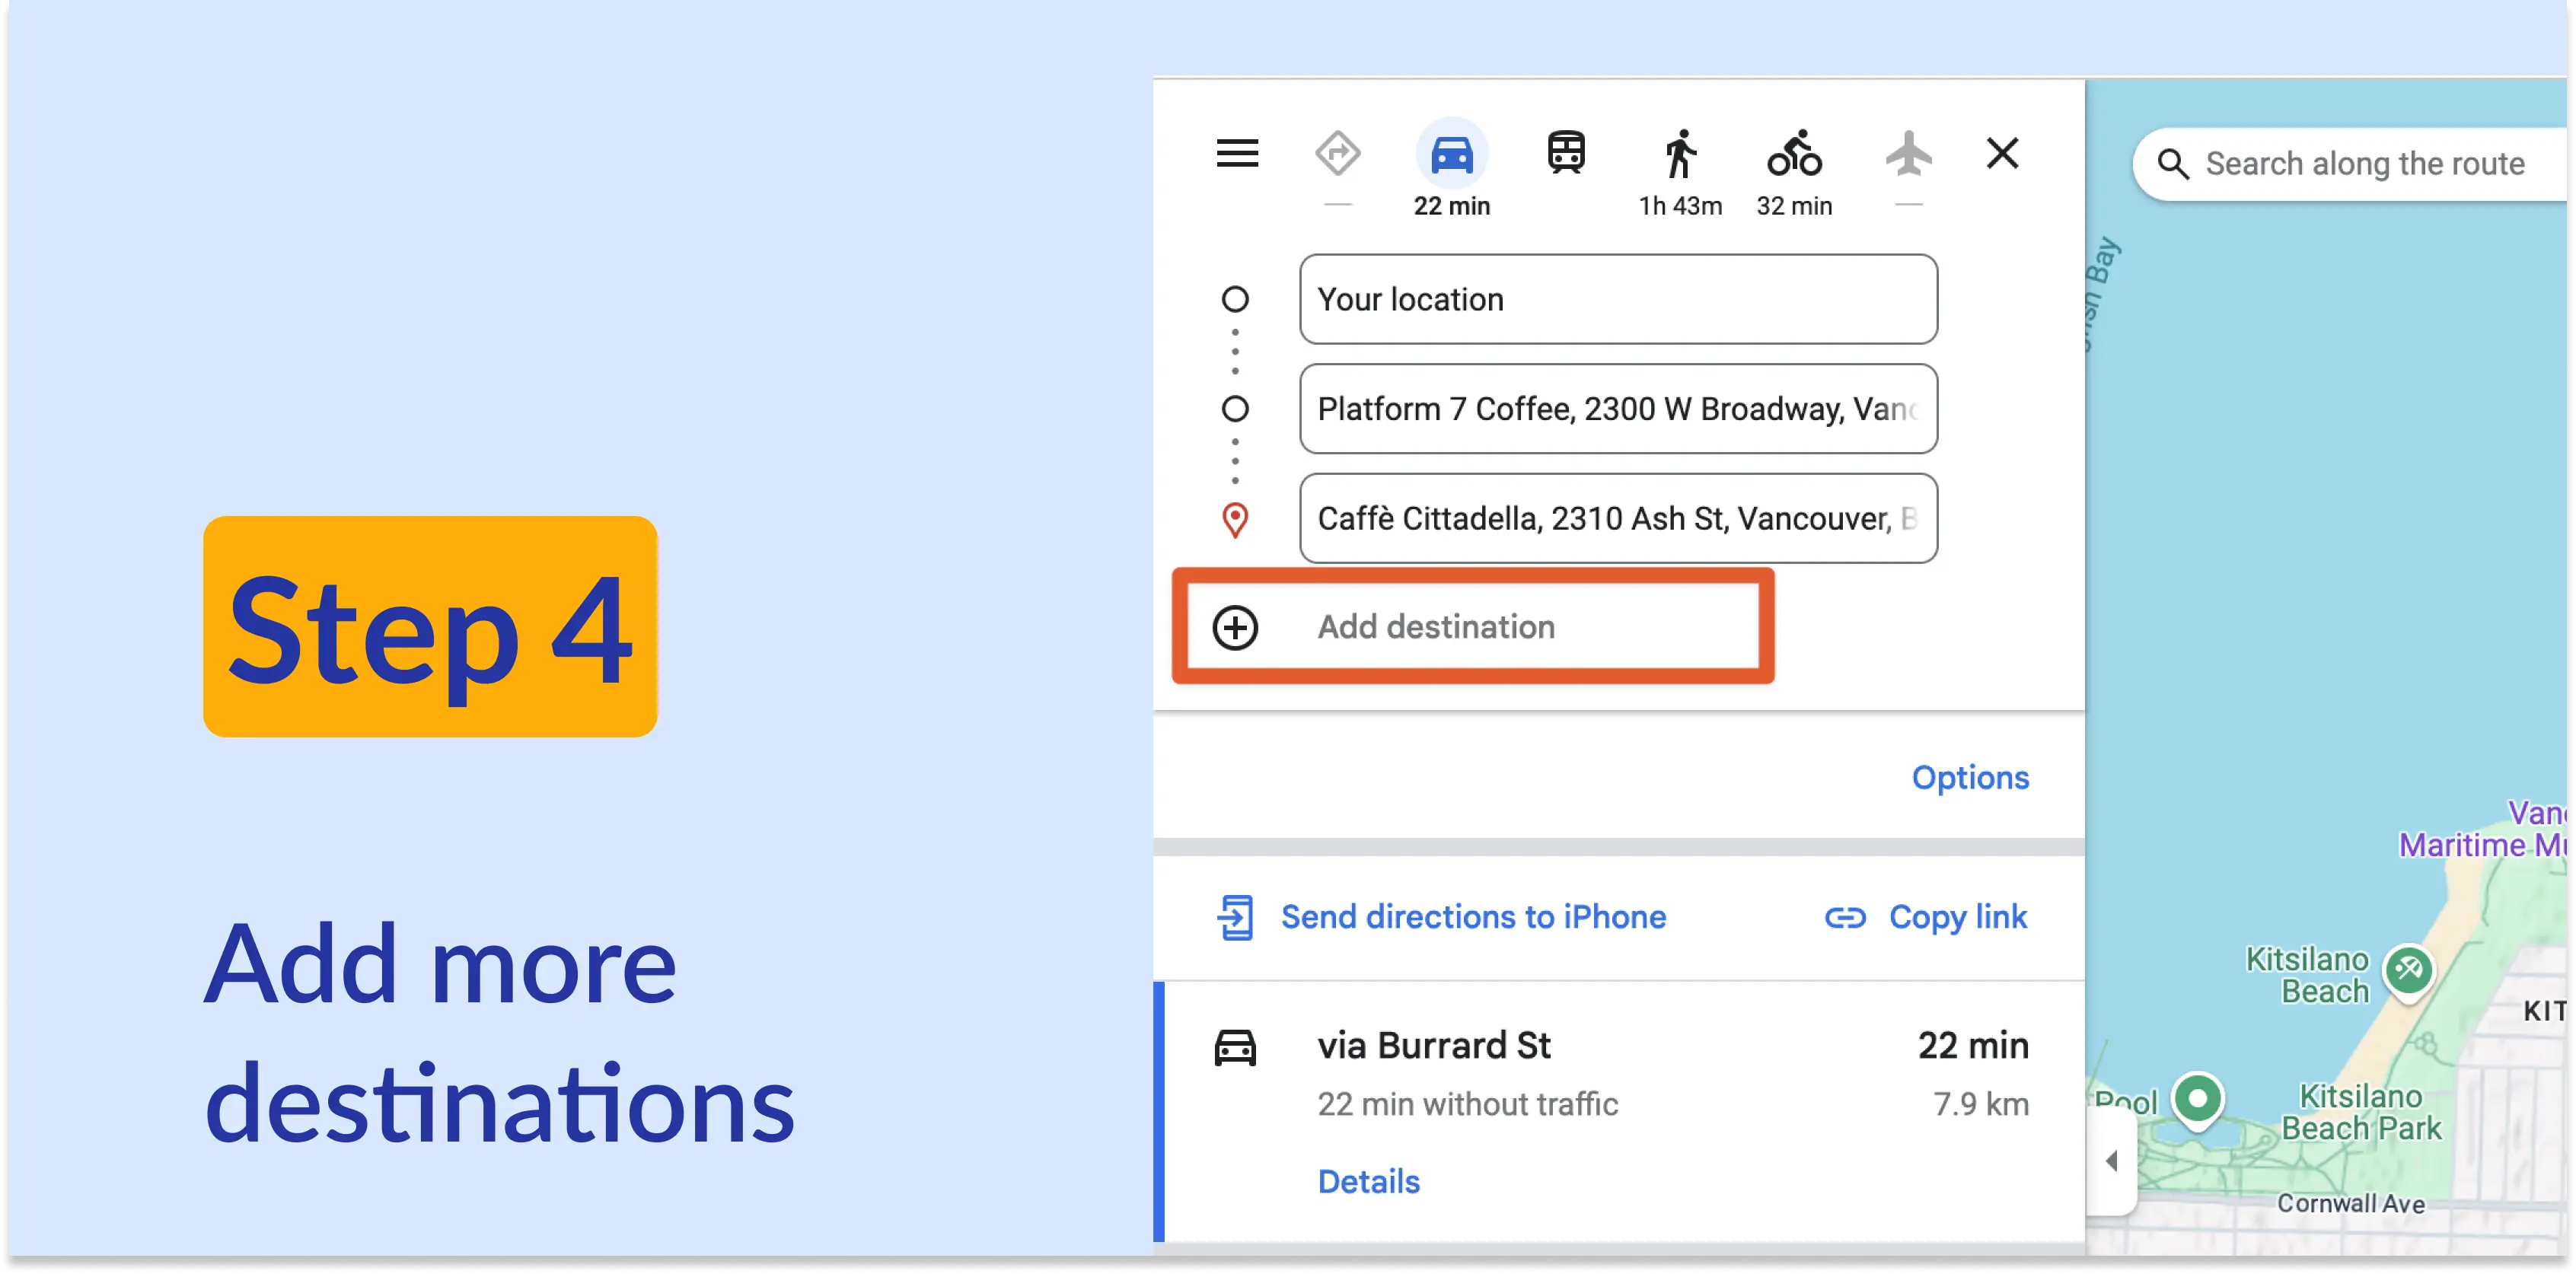
Click the “Add destination” button and a new box will appear ready for the next address.
Now's a good time to check your transport mode. If you're driving, the car icon should be highlighted in blue. You can also choose walking or biking. The public transit mode doesn't allow multiple destinations.
5: Keep adding destinations until you hit the limit
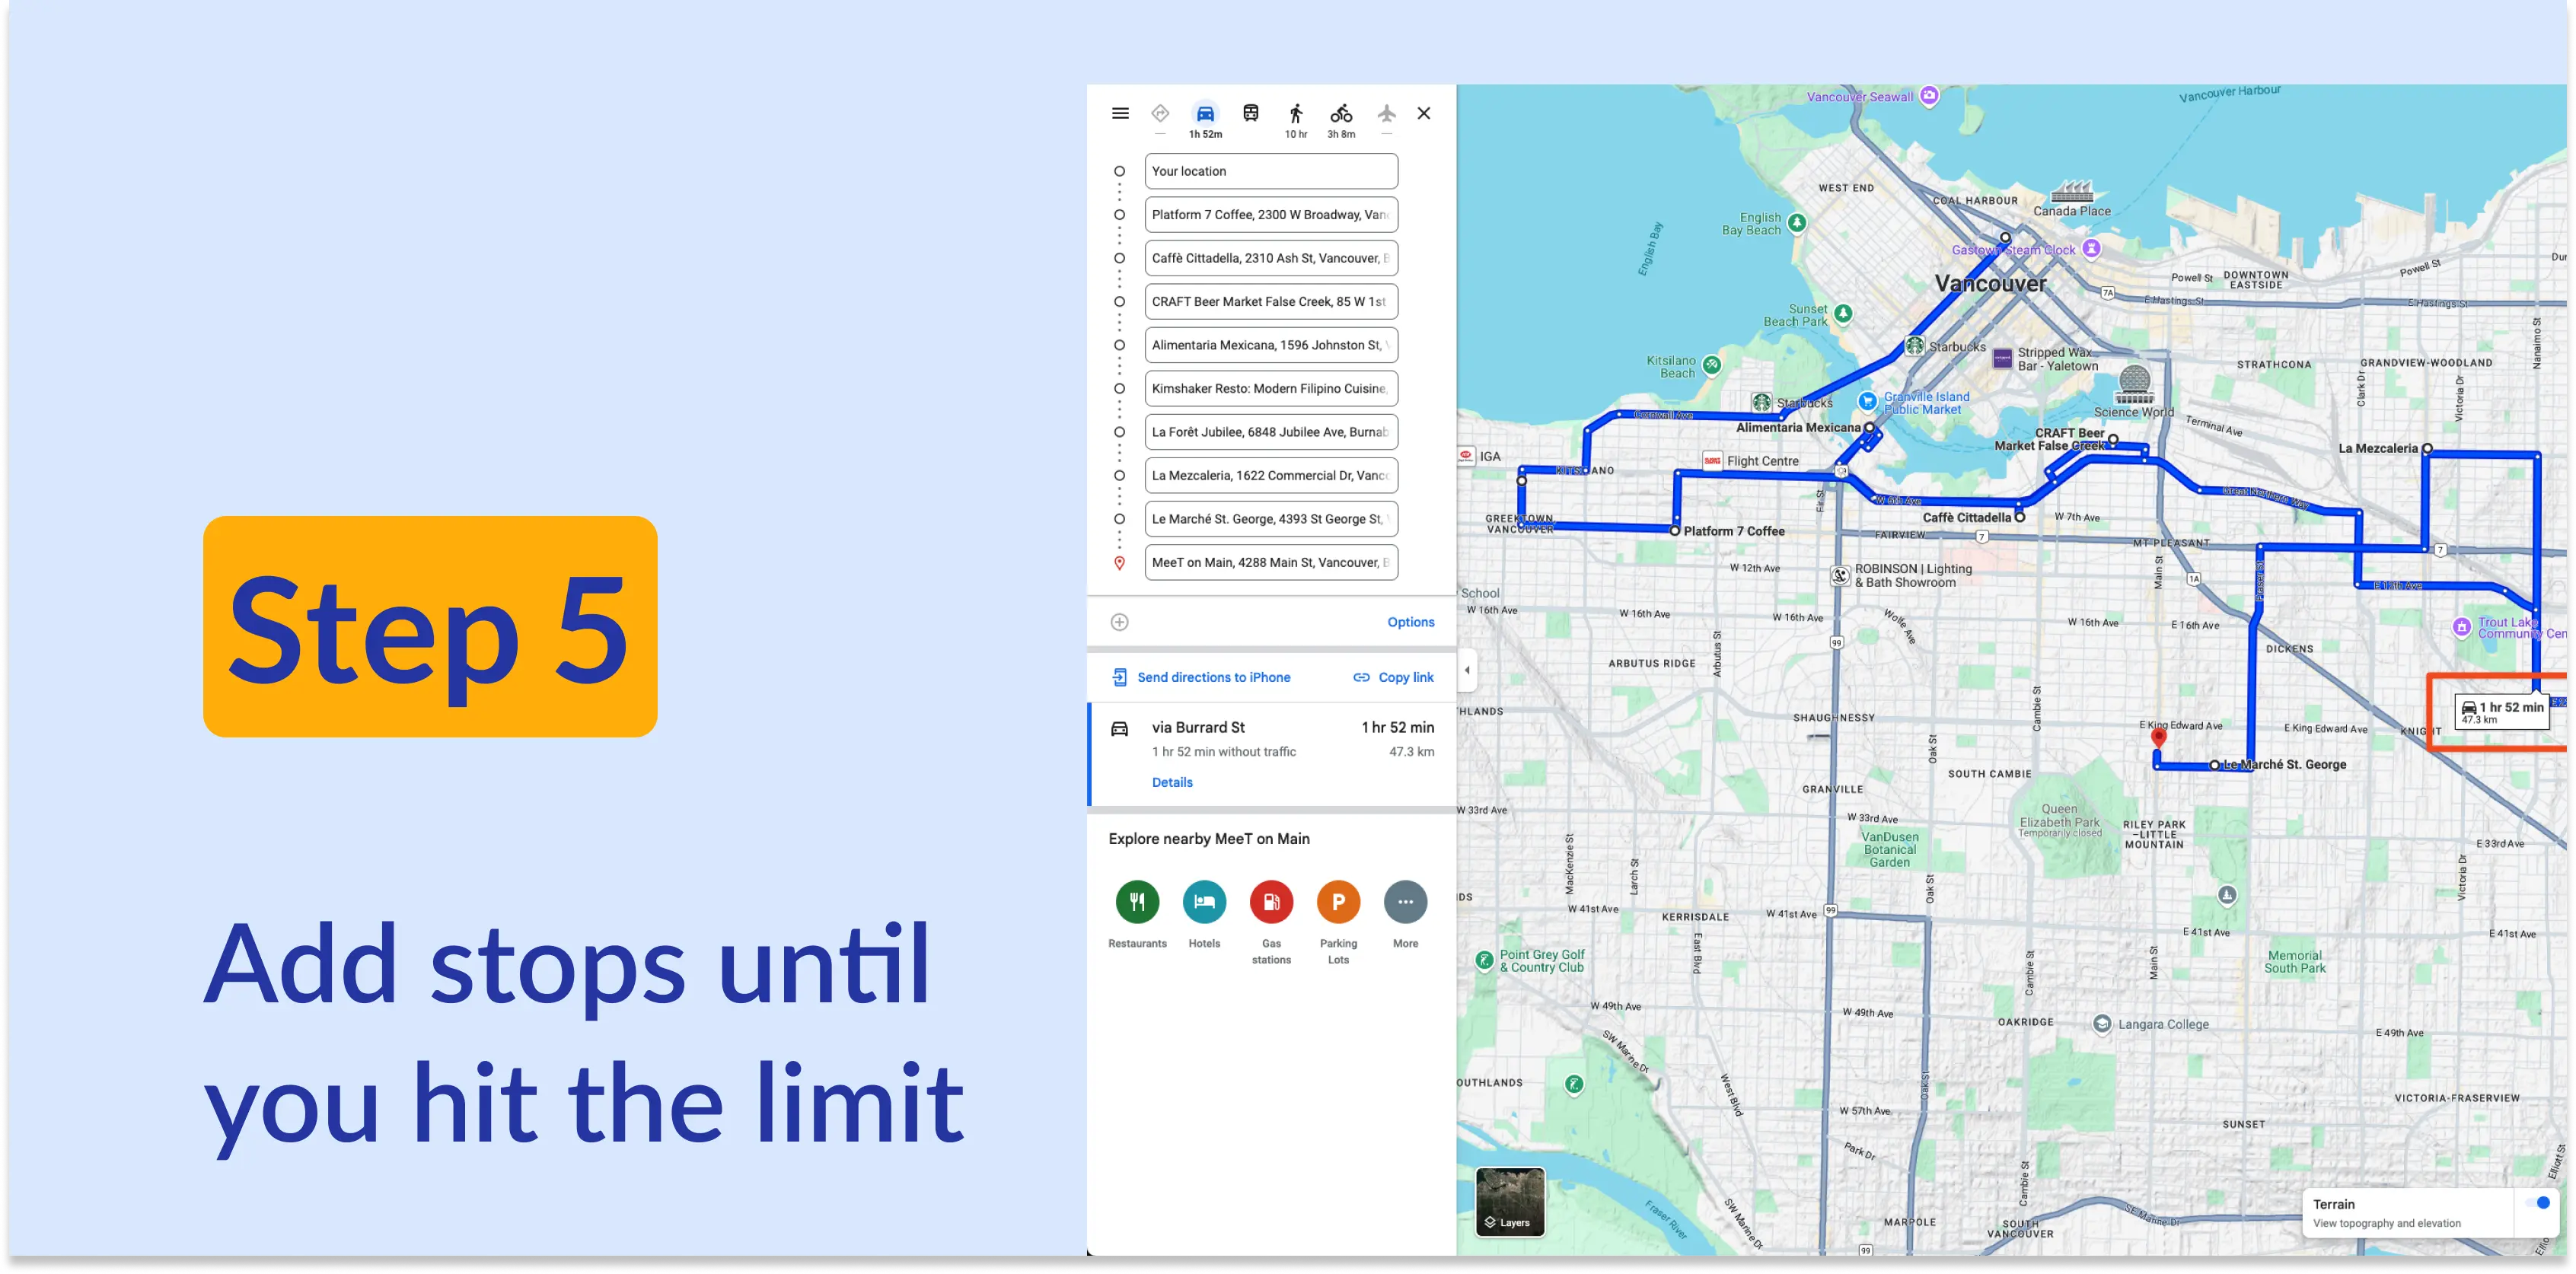
Keep adding destinations until you hit Google Maps' limit of 10 stops.
You'll probably notice the same problem shown in our sample route: it looks like tangled spaghetti. Google keeps addresses in the order you enter them, not the order that makes the best route. A list of stops is not the same thing as an efficient route.
Our sample route clocks in at 1 hour 52 minutes. In the next step we'll cut that.
6: Rearrange your stops to shorten the route

Hover your mouse over any address and you'll see a six-dot icon with a “Drag to reorder” prompt. Click and hold to drag addresses into a new order.
Choose any order that makes sense to you. In our sample we started with the address furthest west and finished in the east. The reordered route cuts our drive from 1 hour 52 minutes to 1 hour 18 minutes — more than 30 minutes saved over just 10 stops.
Google Maps does not automatically optimize stop order. You have to experiment manually. The time savings vary depending on where your stops are, but it's always worth trying at least two or three orderings.
7: Share your route
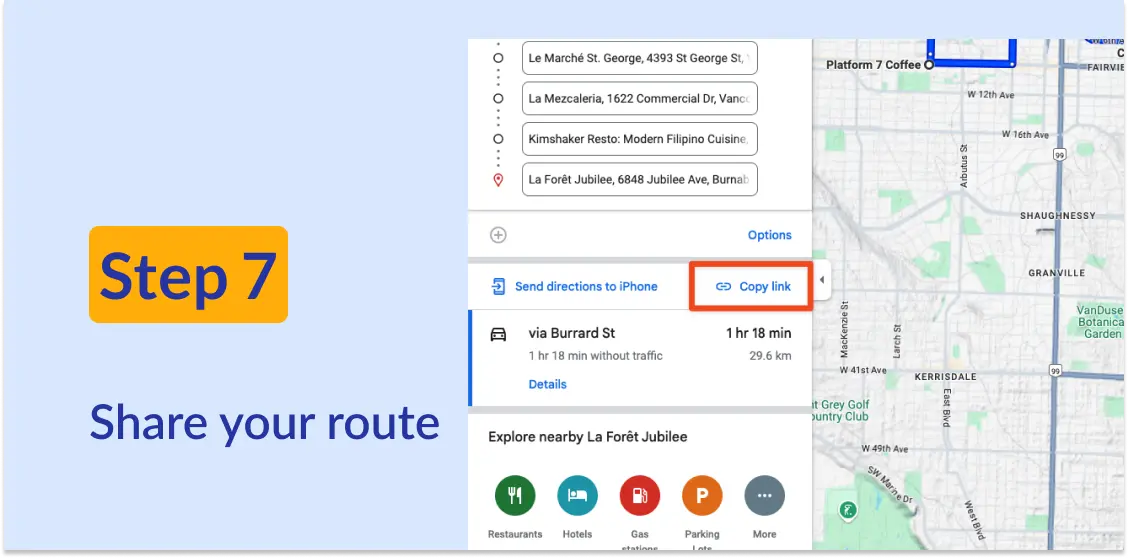
To get your route onto your phone, use “Copy link”. We prefer it over “Send directions to phone” for two reasons:
- “Send directions to phone” can be unreliable — on iOS especially, clicking the link often does nothing.
- Copy link gives you a URL you can save for later, or share via email, text, or Slack.
8: Open the route on your phone

Paste the link into your phone's browser and you'll get a prompt to open Google Maps, with your full route ready to go. If you're at your starting point, the button at the bottom will say “Start”. If you're elsewhere, it will say “Preview” until you're in position.
The three-dot menu at the top right gives you options like “Set a reminder to leave” and navigation preferences — avoid tolls, highways, or ferries.
💡 Tired of manually reordering stops? Routific finds the shortest route in seconds. Free for your first 100 orders.
How to get up to 25 stops in Google Maps
Google Maps caps you at 10 stops, but you can work around it by combining multiple Google Maps pages with the free MoreThan10 tool.
Here's how:
- In Google Maps, add destinations until you hit the 10-stop limit.
- Open a second Google Maps tab and add your next 10 stops.
- For the last 5 stops, open a third tab.
- Copy the URLs from each tab into MoreThan10 and click Submit.
- Open the resulting URL to get your 25-stop route in Google Maps.
That's the full workaround. You'll still need to drag and drop stops to find the best order — MoreThan10 combines the pages but doesn't optimize the route.
When Google Maps isn't enough
Google Maps and MoreThan10 are fine for occasional multi-stop trips. But there are clear signs you've outgrown them and need the additional functionality you can get from dedicated route planning software:
- You routinely plan routes with more than 25 stops.
- You need to assign stops to multiple drivers and balance the workload between them.
- You want the software to automatically find the shortest order instead of doing it by hand.
- You need time windows — for example, a customer who can only accept deliveries between 2 and 4pm.
- You want to calculate accurate ETAs for each waypoint.
- You need proof of delivery, photos, or customer signatures.
- You want to send automatic notifications to customers.
- You're tracking driver progress in real time.
If two or more of these apply, it makes no sense to use Google Maps — it's the wrong tool for the job, like trying to use a screwdriver to hammer a nail in. Dedicated route planners handle all of these use cases automatically.
Routific plans routes for up to 50,000 stops per day, optimizes stop order automatically, and includes proof of delivery, customer notifications, and driver tracking. Pricing starts free for your first 100 orders, then $150 per month for up to 1,000 orders. You can try it free for seven days — no credit card required.
Free alternatives to Google Maps route planner
If you're not ready for a full delivery platform but Google Maps isn't enough, a few free route planners sit between the two:
- Soloroute: A simple route planner that handles up to 25 stops quickly. You can open the finished route directly in the Google Maps app to get a driving route.
- RouteXL: Plans routes of up to 20 stops on the free tier, with paid upgrades for longer routes.
- MapQuest Route Planner: Simple optimization of up to 26 stops.
See our full list of free route planners for more options.
What Google Maps is good at (and what it isn't)
Google Maps is great for:
- Getting the fastest route between two or three points.
- Turn-by-turn driving directions.
- Avoiding tolls, bridges, or ferries.
- Live re-routing based on traffic.
- Destination details like opening hours and photos.
- Walking, biking, and public transit directions.
Google Maps is not great for:
- Routes with more than 10 stops (you need a workaround).
- Finding the shortest order for your stops — it won't create optimized routes.
- Delivery management features like proof of delivery, customer notifications, or multi-driver dispatch.
Frequently Asked Questions
How many stops can you add on Google Maps?
Google Maps lets you add up to 10 stops per route, including your starting point and final destination. If you need more, you can use the free MoreThan10 tool to combine multiple Google Maps pages into a single 25-stop route. For anything larger, you need dedicated route planning software.
How do I add multiple stops on Google Maps?
Open Google Maps, search for your first destination, and click “Directions”. Enter your starting address, then click “Add destination” to add each additional stop — up to 10 total. To rearrange the order, hover over a stop and drag it using the six-dot icon on the left.
Does Google Maps optimize stop order?
No. Google Maps keeps your stops in the order you enter them: it can’t find the most efficient route. It’s designed as a navigation app, not a route optimizer. You have to drag and drop stops manually to experiment with different orderings. For automatic route optimization, you need dedicated software like Routific.
Can I plan a route with unlimited stops in Google Maps?
No. Google Maps caps routes at 10 stops, or 25 stops if you combine multiple pages using MoreThan10. For unlimited stops, you need a dedicated route planner. Routific handles up to 50,000 stops per day.
How do I plan a multi-stop route for free?
Google Maps lets you plan multi-stop routes for free, up to 10 stops at a time. For up to 25 stops, combine Google Maps with the free MoreThan10 tool. For longer routes, try a free route planner like Soloroute or RouteXL — both have free tiers, with paid upgrades for more stops or advanced features.
Is Google Maps good for delivery routes?
Google Maps works only for very small operations — think a single delivery driver making fewer than 10 stops a day. For anything larger, it falls short: no route optimization, no support for multiple routes or multiple drivers, no proof of delivery, no customer notifications. See our Google Maps route planner for deliveries guide for the workaround, or try a dedicated tool like Routific for a free trial.
How To Use Google Maps As A Delivery Route Planner
How To Plan Delivery Routes With Excel (With FREE Template)
